Learning photography has been an incredible journey over the last few years and I feel like I’ve come a long way in a short amount of time. But something truly amazing happened when I finally learned how to properly edit my travel photos with Adobe Lightroom.
My travel photography suddenly went from “Meh,” to “Wow!” I could finally recreate on the screen what I had seen with my naked eye. It was (and still is) addicting, and I’ve never looked back.
I may have looked to the side once or twice, and I’ll share a few of my favorite Lightroom alternatives with you at the end of the post, but no photo editing app or program was ever able to eclipse what I could achieve with Lightroom and the ease with which I could do it.
I’ve heard the great photographers’ debate (Photoshop versus Lightroom) more times than I can count. There are certainly cool things Photoshop can do that Lightroom cannot, but the complexity of the program and the degree to which you can manipulate reality in Photoshop just doesn’t seem necessary–at least, not for a new photographer.
So, if you’re interested in travel photography and you want my humble opinion (I hope that’s why you’re reading my blog, anyway 😉 ) then all you need to create incredible photos is little ol’ Lightroom.
Please note: This post contains affiliate links, meaning I may earn a small commission if you make a purchase, at no extra cost to you. Thank you for supporting The Sweetest Way!
Why I Love Lightroom for Editing Travel Photos
Lightroom is perfect for editing travel photos because I don’t have to be connected to the internet to use it. I can edit travel photos while I’m actually traveling on trains, buses, or flights, or while passing time in airports (I’ve actually done all of those things, by the way).

Before I discovered Lightroom, I used an online photo editing app called PicMonkey, so suddenly being able to edit whenever I wanted was a real treat (I’m really coming off like a photography geek now, aren’t I…).
Once you get the hang of the basics, it’s fairly easy to continue expanding your knowledge, too. I’ve been building upon my skills through free YouTube tutorials lately–there is a wealth of information just waiting to be discovered (I’ve included some of my favorites in this post).
It’s also fun to simply play around with your images to find your favorite editing style because every change you make to an image in Lightroom can be undone; you can experiment to your heart’s content.
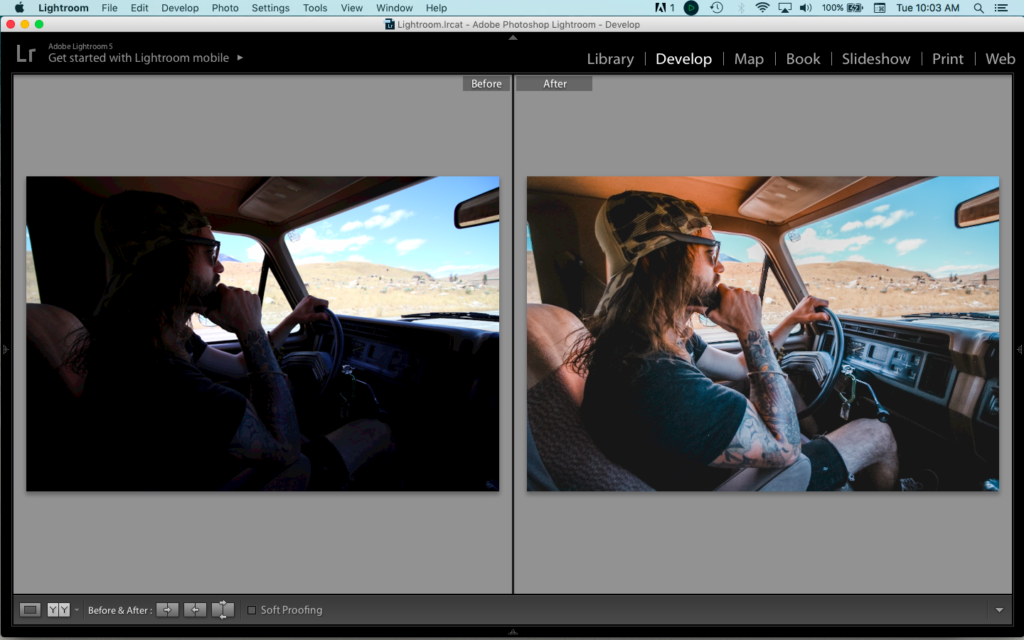
But instead of just telling you why I love Lightroom so much, let me show you a few examples…
Photos that lack that little something extra suddenly shine brilliantly, and even photos that you might have once deemed unusable can be brought back to life.
But before we dive into the nuts and bolts of editing with Lightroom, let’s talk about some travel photography best practices.
Travel Photography Best Practices
The best camera is the one you have with you
You really don’t need the best of the best cameras to take great travel photos, but if you really want to get serious about it, you should consider investing in a DSLR. I use one of the most basic and lightweight DSLRs available and it does the trick just fine. Even with the stock lens, it produces beautiful images.

The Canon Rebel SL1 (the camera I shoot with) is great for traveling because of how compact it is, and I didn’t spend an arm and a leg to buy it (just a few hundred compared to a few thousand for the bigger/more advanced models). In fact, all of the Rebel models are fairly inexpensive.
Compare that to the $2,300 you would pay for a full-frame body like the Canon 5D Mark III (lens not included) and it’s practically robbery.
Once you become familiar with the workings of the starter camera you choose, you can begin experimenting with different lenses to create different effects–the body of the camera is often less important than the lens when it comes to creating quality images.
When I can’t be bothered with a bulky camera, my GoPro takes excellent travel photos; it’s a great backup camera because it’s so compact and portable.
Always shoot in RAW
If you want to edit your photos exactly how you like them, you need to change your camera settings so your images are being captured as RAW files.
A JPEG file (your camera’s default setting) has already been partially processed in camera, leaving you with less data to work with when you upload it to a photo editing program. A RAW file, on the other hand, has not been processed giving you flexibility and total creative liberty to edit the image as you see fit.
JPEG is ideal for new photographers who aren’t interested in delving into post-processing and want a photo they can instantly share, but since you’re here to learn about editing, you’ll want to start shooting in RAW if you’re not already. This video gives a good explanation of the differences between JPEG and RAW files.
When sharing your photos or using them in blog posts, you will need JPEG files, and they can be easily converted to this format when you export them from Lightroom (more on that below).
Invest in some bigger memory cards
Because RAW files are so much larger than JPEG files, you’ll need more space to store them while shooting. I use a 64GB memory card and have an additional 32GB card as a backup. This allows me to shoot a ton of photos without ever running out of storage space.
Create the best possible image in camera
While the editing process can help you take a photo from so-so to amazing, you won’t always be able to salvage a photo that’s bad from the start. If it’s severely under or over-exposed, too grainy, or improperly framed, editing can only get you so far.
Learn the basics of composition and understand how aperture, shutter speed, and ISO each play a role in getting the right exposure in various lighting conditions. And most importantly, practice, practice, practice.
Regularly back up your image catalog
Lightroom will prompt you to back up your catalog each time you close the program, and it is recommended you do so at least once a week. Of course, you can do this more or less often depending on how frequently you are importing new photos.
It’s important to have a copy of your catalog in more than one place, too, in the event that one of your storage devices fails you. I used to store my catalog on my external hard drive only until I dropped it and was unable to recover any of the files. I recommend using a cloud storage service for a small monthly fee.

Lightroom Tips & Tricks
You don’t have to invest tons of money in education to learn how to properly use Lightroom. In fact, there is a tutorial for just about every step of the process on YouTube, so I’ll share some of my favorites here.
Getting acquainted with Lightroom
This video gives a quick rundown of just about everything you need to know to get started using Lightroom, from importing your photos to the various sliders used to edit your photos to exporting the finished files to your computer for sharing.
Creating your own Lightroom presets from scratch
Creating a Lightroom preset is like creating your own signature filter that can be applied to all your images to give them a cohesive look. This is a popular way for Instagrammers and bloggers to edit travel photos and is a massive time saver if you have one particular editing style you want all of your photos to have.
The Tone Curve is your friend
The best thing I have done for my travel photos in recent months is finally understanding (and using) the tone curve in my editing process. For far too long, I was intimidated by this little square and thus avoided it, which was a big mistake.
Using the tone curve, I’m able to bring out details in my photos where I never could before. Previously, I relied on my clarity and sharpness sliders, which only made my photos look harsh or grainy.
The following video is the best one I’ve found so far that explains the tone curve in a clear and concise way and gives an example of what the tone curve looks like in a final edit.
Exporting JPEG files from Lightroom
Exporting files from Lightroom is pretty straightforward, but there are a few settings it’s worth knowing about beforehand so you don’t end up with unnecessarily large file sizes.
And for the purpose of blogging or sharing on the web, photos generally do not need to exceed 1024 pixels in length or width.
An exception to this rule is Facebook. Facebook is notorious for compressing files into pixelated disasters. You can avoid this by uploading images to Facebook with a width of 2048 pixels. Check out this Lifehacker article for more info.
Lightroom for Mobile Devices
I only recently discovered Lightroom for mobile, but I fell quickly in love. Just like its desktop counterpart, the mobile app can take your so-so iPhone or Android photos to a level you never knew was possible.
You can use most of Lightroom’s features simply by downloading the free app; for full use, you would need an Adobe Creative Cloud account (which gives you access to a number of Adobe programs for a monthly membership fee). I use the free version–download it in the App Store or Google Play.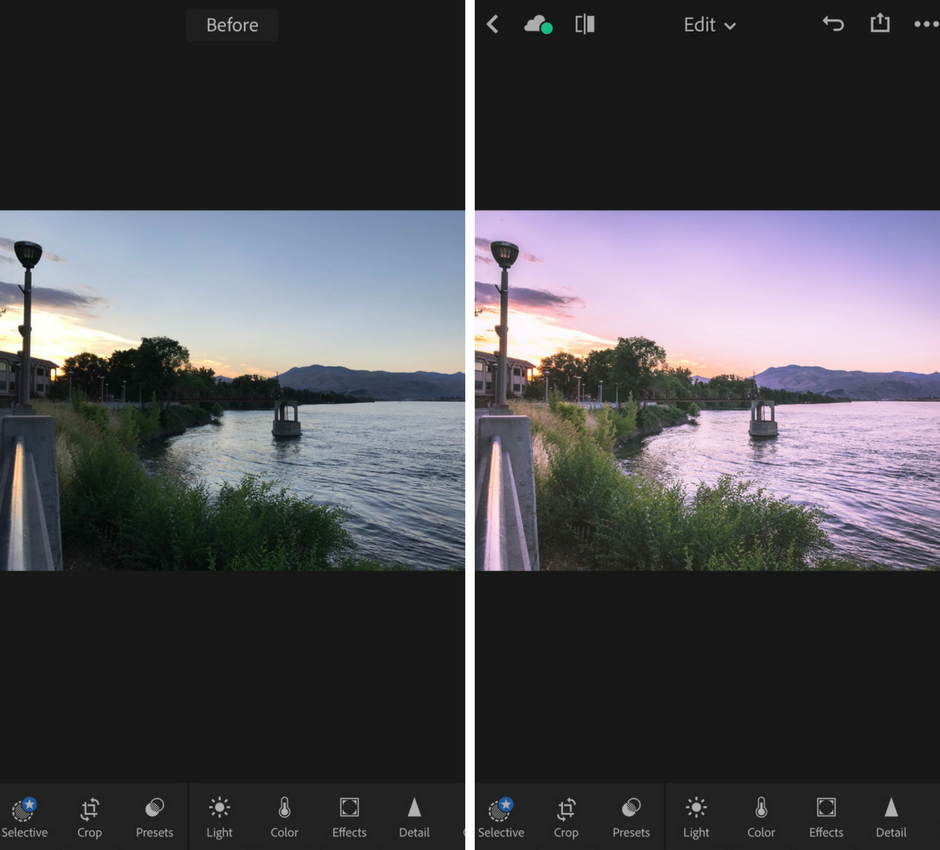
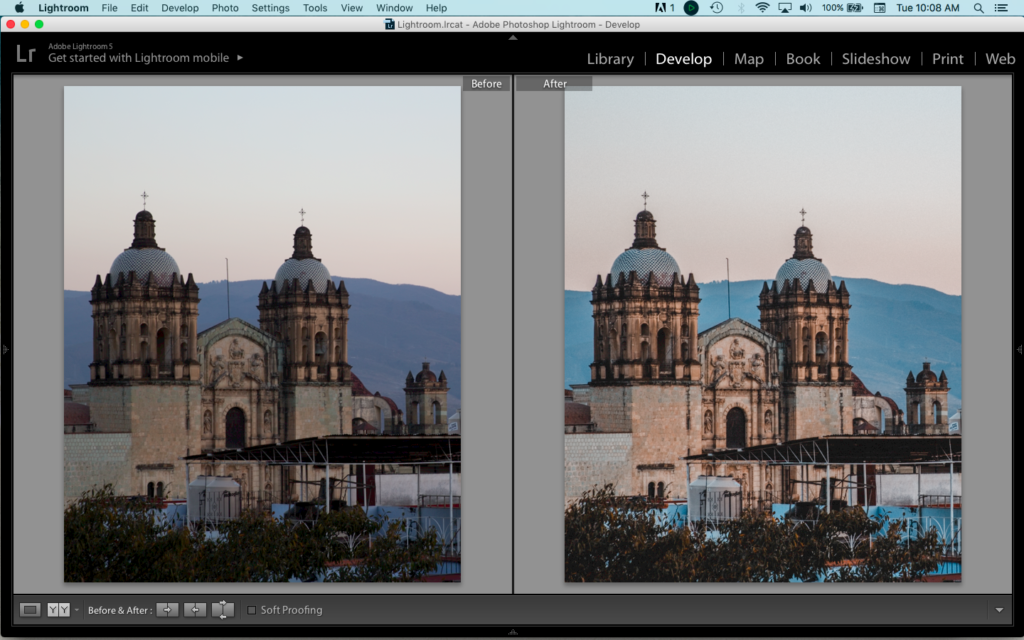
How I Edit Travel Photos
My photo editing process has changed a lot over the years as I continue to learn new techniques and hone in on my preferred editing style, but I’m definitely getting closer.
There are a few things that have remained the same over time, however:
- I always straighten my horizon (I can’t stand a wonky horizon)
- I like the look of soft vignetting around the edges to make the subject pop
- I always remove chromatic aberration (also known as color fringing)
- I use the tone curve to “crush the blacks” (give them a faded look)
- I’ll sometimes use the Spot Removal tool to remove unwanted spots or even people from the background
More recently, I’ve learned some new tricks:
- For portraits and other shots with people in them, I reduce the clarity to about -10
- For most other photos, I do not touch the clarity slider at all
- I created my own preset loosely based on the cinematic “orange and teal” look (see video below)
- I use my preset as a starting point for editing all of my photos to give them a cohesive feel
If you don’t have time to edit your own photos, you can always outsource the task to a professional photo retouching service.
Presets for Lightroom
If you don’t want to make your own presets for Lightroom, you can purchase ready-made presets to instantly add a professional finish to your photos with minimal effort on your part.
Etsy is a great place to shop for preset packs; you can find them as cheap as $5.99 for a set of 25. Alternatively, you can support your favorite Instagrammers, YouTubers or bloggers by purchasing their own presets.
You can also download many free Lightroom presets that can be used to bring out the best in your travel photos, whether portrait, landscape, sunset, or cityscape.
Other Apps for Editing Travel Photos
I’ve dabbled in other photo editing apps over the years, mostly on mobile, but none of them ever lasted long. At the end of the day, I have much more control over the final outcome of my photos by learning to properly use a program like Lightroom or Photoshop. For me, it was well worth the extra time and effort.
That said, if you’re short on time and want some programs that are quick and fairly effortless to use to touch up and add filters to your photos, here are a few of my favorites:
Read More Travel Photography Tips on The Sweetest Way
- Amazing Travel Photos With a GoPro: Tips, Tricks, & Tools
- 6 Simple Ways to Get Great Self Portraits While Traveling Solo
- The Travel & Photography Gear I Never Leave Home Without
- Stylish Camera Bags for the Traveling Photographer
- Find Your Own ‘Instagram-Worthy’ Spots (and Keep Them to Yourself)
What are your favorite Lightroom tricks for editing travel photos?